Developing best practices
Amplify is a toolset which leverages a variety of AWS cloud services in order to quickly and easily build scalable web applications.
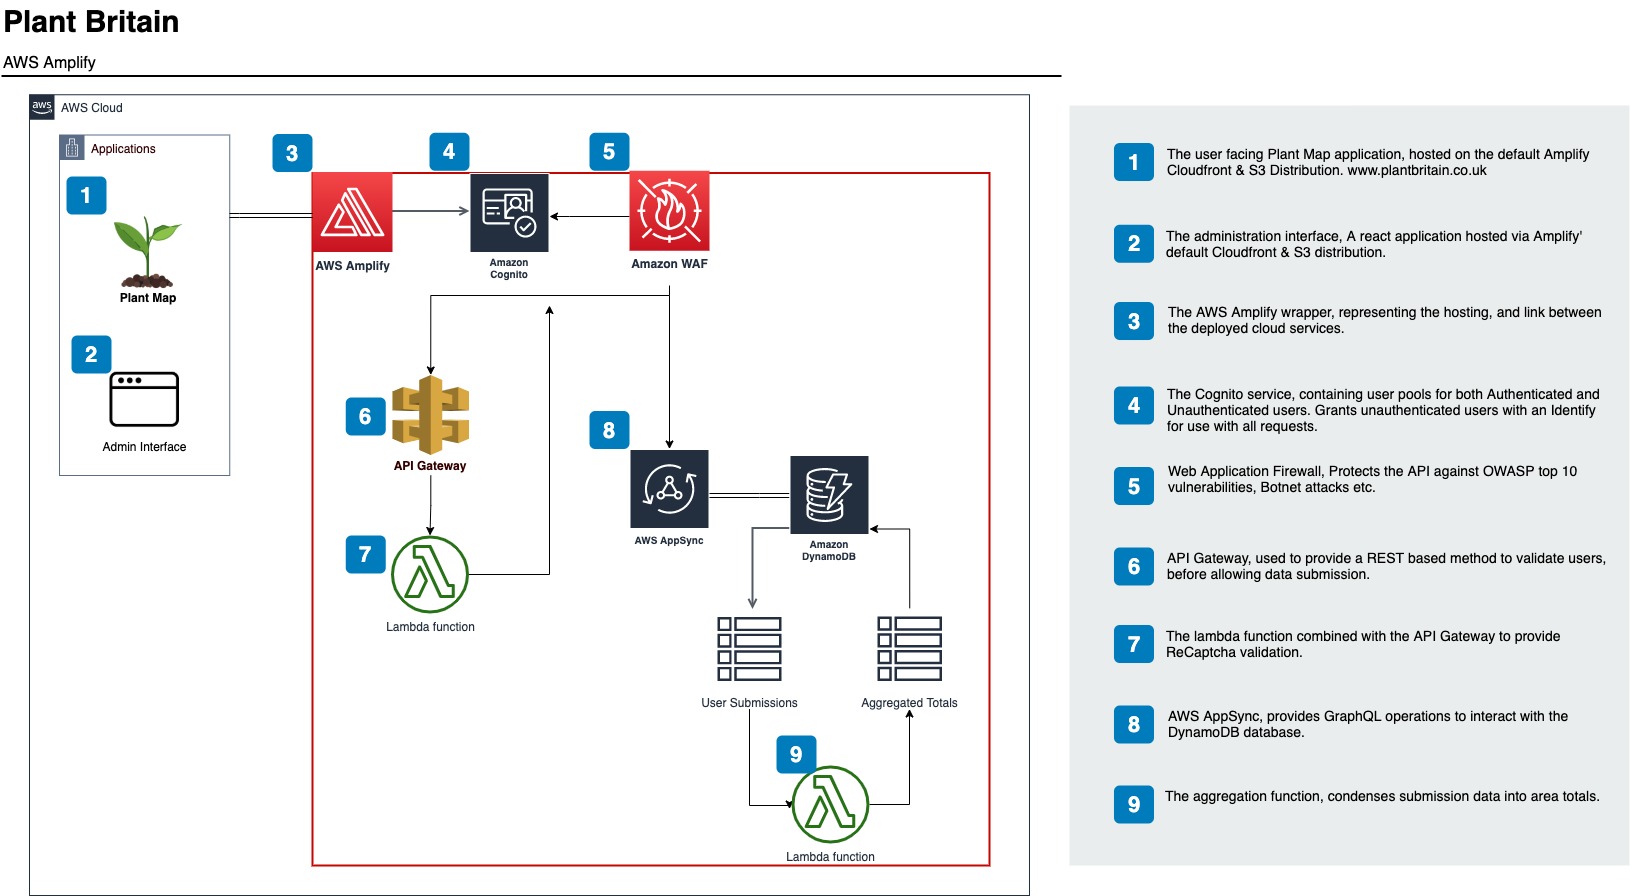
We’ve recently used Amplify to build and host an interactive map for the BBC’s Countryfile Plant Britain campaign, “an ambitious two-year challenge aimed at galvanising everyone in the nation to get planting – no matter where you live or how large or tiny a space you may have – to help combat climate change and at the same time, boost our wellbeing and wildlife”.


Whilst this is a relatively small application, it does have to scale to sufficiently cope with a significant amount of users in a short space of time. Alongside this, we aimed to have data updates in real-time as and when users submit their plantings, this translates to areas of the map rising from the canvas. Amplify was an ideal choice, with it’s scalable infrastructure and AppSync data subscriptions.
There are many articles detailing the wonders of Amplify and how easy it is to hit the ground running with a fully fledged application, with all the bells and whistles in a mere few minutes.
I cannot argue with that premise, the Amplify CLI enables you to build a robust application very quickly indeed.
However, very few write-ups really transcend the realm of example To-do and Note applications.
In this post, I aim to touch on some of the trials and tribulations we’ve encountered whilst building our first production application with Amplify.
First and foremost, Authentication
Amplify add auth
Authentication is the very first step in the process, as it sits on top of all operations. It is the glue binding the application together.
The amplify add auth method and underlying Cognito service provides a few Authentication implementation options regarding user registration, authentication, account recovery and other operations.
Additional authentication specific configurations are also found within other aspects of the app, such as the API, which we’ll get into later on.
One of the stumbling blocks we’ve hit with regards to the Amplify CLI is specifically related to the Authentication configuration, and more specifically, updating this over time as the dynamic nature of agile application development presented itself.
Initially, we created the Authentication without knowing exactly which options we’d like to have.
For instance, multi-factor authentication (MFA) was disabled.
Little did we know at the time, we couldn’t simply enable the MFA required option via the Amplify update auth CLI method…
This is because the underlying Cognito service does not allow it. You can only choose ‘required’ when initially creating a user pool.

TAKE AWAY: If you’re considering using MFA, decide upfront and add it in the initial build
Ok, fair enough… now what? Let’s remove Auth via Amplify remove auth and re-add it again via Amplify add auth
Oh, boy… what is this hell we’ve unleashed upon ourselves? Amplify attempts to update the backend stack via CloudFormation, but fails due to Authentication being a dependency of our API.
This wouldn’t usually be an issue, as more often than not, Amplify will reverse the changes. However, reverting the stack after a failure does sometimes fail more often than I’m comfortable with! It is with this in mind that I learnt to apply caution with every back end configuration change.
Additionally, I’d only recommend making singular backend stack changes, committing them to source and allowing all environments to catch up (Providing you have your backend built via source control). A chained list of updates often does fail, perhaps because there’s no specific order of priority whilst the CloudFormation process churns away, leading to all manner of issues… Orphaned IAM Policies, S3 buckets and other such resources end up intrinsically linked in such a way as to confuse the process.
The above is true for all aspects of the Amplify CLI and Amplify push method… keep changes to a minimum and sync them to the backend stack asap!
TAKE AWAY: If you’re going to update the backend stack, do it one change at a time.
Another issue we’d found was that only a select few Cognito templates were available within the scope of the Amplify build scripts… we had to use the Cognito UI to add custom email templates etc.
I’ve had to rebuild the entire application stack more times than I’d care to admit as a result of small configuration changes going badly, and it’s only after experiencing what you can, and cannot get away with changing, that you learn the true nature of Amplify’ dependency hell.
TAKE AWAY: Amplify CLI categories cannot always be updated in their entirety, and some configuration options are missing.
API (AppSync GraphQL)
I can write this small snippet of a schema and subsequently have all my CRUD interactions built?
Truly, a wonder.
You’d better get those keys correct on the initial build though! You cannot update the keys of a DynamoDB table after it’s been created via GraphQL. You either end up having to create new keys whilst renaming the old keys, then renaming the new keys back to the old keys…
or removing the API and starting again, Good fun.
This makes things challenging when you haven’t quite finalised your database design due to evolving requirements, but need to get on with the build.
Keys are quite important, if for instance you want to filter a result set via any of the available fields, you need a sort key for each field… that could be a lot of keys! The alternative is to stream your DynamoDB table to the Elasticsearch service via the @searchable directive in the graphql schema, but we didn’t want the additional overhead.
TAKE AWAY: Creating a DynamoDB table requires you plan out the exact structure of your table first (Even though DynamoDB is schema-less).
API Authentication
During the initial setup, we specified which Authentication type we’d like to use.
In our case, we want to use IAM.
I found the documentation was quite vague in terms of explaining the various authentication types, so here’s a little bit about how IAM auth works:
Authenticated users access resources via Cognito, which uses the IAM Auth user, this user has all of the relevant policies associated with the access you defined in each part of the stack.
Unauthenticated users access resources via an IAM Unauth user, which again has access policies, but often far more limited than the auth user.
This effectively secures your API for all users, whether they’re authenticated or not.
An Unauthenticated user pool is provisioned within Cognito, alongside the Authenticated user pool.
Coupled with the Amplify JS framework, upon accessing the application, unauthenticated users are granted a Cognito user token which grants them access to the underlying Unauth role, and of course, authenticated users get the Auth role. This prevents direct external access to the API, as all requests must originate from valid user sessions.
With the IAM auth set, we can now protect various aspects of the API on a granular level, using the @auth directive.
@auth(
   rules: [
     { allow: private, provider: iam } , # authenticated users can update, delete,     and read
     { allow: public, provider: iam, operations: [read, create] } # unauthenticated users can read and create
   ]
 )
TAKE AWAY: IAM accounts work well, but remember public users are treated as unauthenticated accounts.
Perhaps the greatest irritation of all
GraphQL does not have a total count!
Ok, that’s not entirely correct…
It does have a total count, but it’s often hours out of date as it’s based on a default full table scan operation, which occurs on a schedule.
In order to calculate the overall total of items in the table you’d have to scan the table in its entirety, which racks up the costs.
You could maintain your own total count, which would require further write operations. Twice whatever your existing rate is.
Either way, it’s not great. Total counts are quite important, especially when paginating through a result set.
TAKE AWAY: DynamoDB (currently) doesn’t seem the most mature of DBs.
Monorepo
Most applications require a back end management interface of some kind, ours was no exception.
As Amplify is geared towards containing the Amplify build scripts / backend stack config and application within a single repository, it makes sense to keep your backend management application in the same place.
This is where the Monorepo came into play.
Whilst the Amplify documentation is generally lacking overall, it was very void of information with Monorepo’ in particular.
To get this functionality, we provisioned two separate Amplify apps from the same Repository source. Within the repository, we had two separate directories containing the Client and Admin applications, each set as the applications build directory, respectively.

The client application was effectively the child of the admin, with the admin containing the amplify configuration and build scripts.
The client contains a script which runs on build, this script utilizes the Amplify CLI to pull the relevant backend configuration files, which point the seperately hosted client at the relevant backend stack.
As this process wasn’t well documented, the steps outlined didn’t work as documented which lead to a frustrated couple of days of lost development time.
Steps to connect a monorepo:
- Connect the repository to Amplify, select the admin directory and name the application accordingly.
- Same as 1. But with Client.
- Within the Client Amplify interface, and BUILD_ENV for all relevant environments, ie dev, staging, live etc, this will ensure the script pulls from the correct backend. This should match the environment names bound to the repository branches, in Amplify.
- Create ACCESS_KEY_ID and SECRET_ACCESS_KEY env variables, these should be from an IAM account with CLI access to the AWS Amplify resources.
- Ensure the amplify-pull.sh is in the repo directory, not inside the client dir, change the appId hard coded in the file to match that of the backend stack created for the Admin app instance.
- Edit the build image settings for Client, set Amplify CLI to Latest.
- Alter the build configuration for the Client environment, it should look something like this:
version: 1
applications:
  - frontend:
      phases:
        preBuild:
          commands:
            - ./amplify-pull.sh "${ACCESS_KEY_ID}" "${SECRET_ACCESS_KEY}"
            - yarn install
        build:
          commands:
            - yarn run build
      artifacts:
        baseDirectory: build
        files:
          - '**/*'
      cache:
        paths:
          - node_modules/**/*
    appRoot: applications/client
amplify-pull.sh
#!/bin/bash
set -e
IFS='|'

REACTCONFIG="{\
\"SourceDir\":\"src\",\
\"DistributionDir\":\"build\",\
\"BuildCommand\":\"npm run-script build\",\
\"StartCommand\":\"npm run-script start\"\
}"

AWSCLOUDFORMATIONCONFIG="{\
\"configLevel\":\"project\",\
\"useProfile\":false,\
\"profileName\":\"default\",\
\"accessKeyId\":\"$ACCESS_KEY_ID\",\
\"secretAccessKey\":\"$SECRET_ACCESS_KEY\",\
\"region\":\"eu-west-2\"\
}"

# Use BUILD_ENV var to check which backend to pull
AMPLIFY="{\
\"projectName\":\"admin\",\
\"appId\":\"d1esbddrn73ogy\",\
\"envName\":\"$BUILD_ENV\",\
\"defaultEditor\":\"code\"\
}"

FRONTEND="{\
\"frontend\":\"javascript\",\
\"framework\":\"react\",\
\"config\":$REACTCONFIG\
}"

PROVIDERS="{\
\"awscloudformation\":$AWSCLOUDFORMATIONCONFIG\
}"

echo "Build env: [ $BUILD_ENV ]"

amplify pull \
--amplify $AMPLIFY \
--frontend $FRONTEND \
--providers $PROVIDERS \
--yes
Functions
Lambda functions proved to be very powerful, the Amplify CLI made light work of creating a function with the relevant permissions and triggers.
The only real effort was with finding the relevant API methods to tie the function to a service, such as the Node.js API call to update a DynamoDB table, the tedious nature of debugging via the CloudWatch logs was also a bit annoying as it did seem to take a while to update.
TAKE AWAY: Lambda is great.
Summary
Amplify is an incredibly useful tool which can scaffold an application very quickly. It takes a lot of complication out of the process, in fact sometimes It almost feels like cheating, but if and when a push to the backend stack does go wrong, it can do so in a very dramatic manner.
It’s worth taking backups of the Amplify stack configuration before altering anything too drastically, so you can easily spin up a new stack should the need arise.
I personally believe that Amplify suffers from making certain aspects a little too simple, whilst leaving others particularly complicated. There’s quite a curve between setting up an initial application to understanding and altering a GraphQL resolver template to add fields for validation, for instance.
This does lead to a false sense of security when you initially begin the build process, assuming the unknowns will be easily known via reading the documentation, but this is seldom the case.
Most of the issues we encountered could be solved with more in depth documentation and examples.
I eventually found the Amplify naming conventions irritating, why not simply refer to the individual components of the application by their AWS Console names? Auth = Cognito, Function = Lambda, Analytics = Pinpoint etc.
After all, you very often have to get into the nitty gritty with the console directly anyway.
Amplify is evolving at pace, with some of the notable additions looking particularly useful.
The framework now provides an Admin UI at the touch of a button, which includes a visual tool to build a GraphQL schema, amongst other notable improvements, and is backwards compatible in that the Cloud Formation templates it generates can be pulled back into source control.
In spite of its quirks, I look forward to working with Amplify again in the near future.
As it stands, it’s proven to be a very useful tool for application development and I’m sure it will only improve.